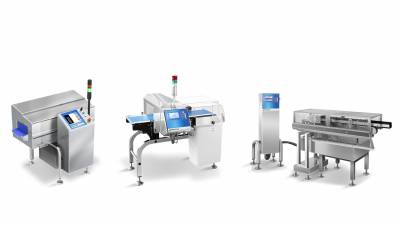
Most common mistakes in the choice of a checkweigher: #1. MECHANICS

Most common mistakes in the choice of a checkweigher: #1. MECHANICS
Mechanics is the most visible aspect of an equipment and it is often sufficient a quick look to get an idea of the quality of the object we have in front.
Nevertheless, four mechanics-related aspects are often overlooked which are instead crucial to the right understanding of the price/quality ratio of a checkweigher.
Please find hereunder the 4 mechanics-related mistakes to avoid in a checkweigher.
1. Base and support structure
In the past most of the checkweighers worked on a surface known as “cantilevered” (see Figure 1): the plates were mounted perpendicularly to the support structure, that is to say through one-way fastening.
From the constructor’s point of view, that meant fewer items to assemble and therefore huge savings in production. Over the years and with technology improvements, it has become clear that this kind of base didn’t ensure the required stability for the correct weighing. Since several years, the main checkweighers constructors have been designing the new models starting from a layout featuring four supports on weighing axis (see Figure 2).
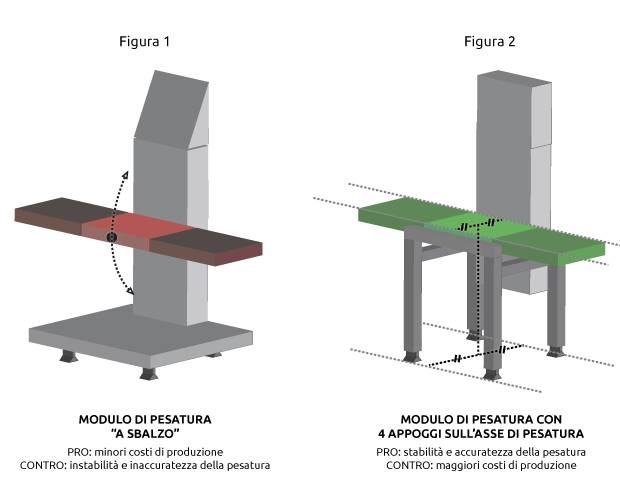
Thanks to this simple adjustment, the latest checkweighers ensure better results in terms of accuracy and precision. Purchasing an old generation checkweigher in order to save some money is the first mistake to avoid: money saved while purchasing cannot be compared to the loss due to false rejects and product waste.
2. Balancing and layout of the weighing system
In order to obtain satisfying performances even at high speed, the weighing system, composed of plate, rollers, engine and, of course, load cell, has to comply with certain rules of physics. In view of their complexity, these issues tend to be wrongly underestimated while purchasing. However, taking concepts to the extreme, we can identify a couple of aspects of simple evaluation.
Balancing of the weighing system
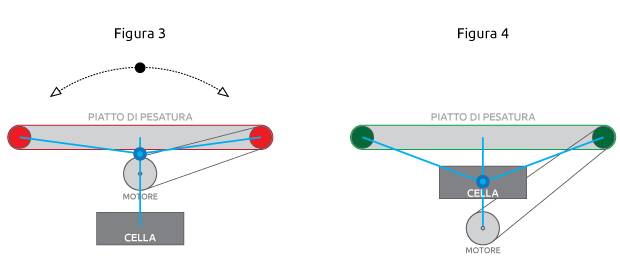
Figure 3 illustrates a weighing system in which the cell is located under the rollers engine. In this case the barycenter of the system (namely the centre of mass of the system, marked with a blue circle) is near the plate, therefore near the upper limit of the system. In other words, the system is unbalanced, heading upwards, and hence unstable, which affects the stability at high speeds and increases the risk of cell damages.
Figure 4 illustrates a system in which the loading cell is placed above the engine. With this layout the barycenter of the system is situated in the centre of the system, that benefits in balance and stability, improving the performance.
Placement of the weighing cell
As it is easy to guess, the shortest is the distance between the plate (and hence the product) and the cell, the best will be the latter’s performance in weighing detection.
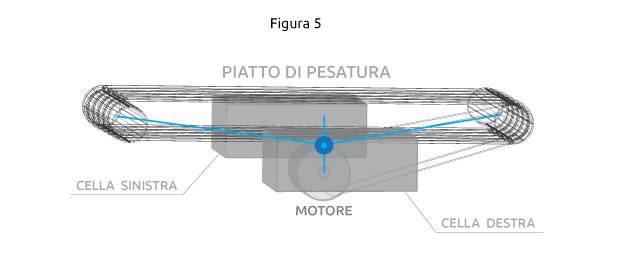
Specific measures, for example the use of two cells, allow to shift the cells to the conveyor sides in order to bring the engine closer to the plate thanks to the empty space and consequently to reduce the overall height of the weighing system. All those things contribute to bring the cells closer to the product, keeping at the same time the barycenter at the centre of the module (Figure 5).
3. Rapidity in cleaning and sanitizing operations
A very important part of the analysis concerns the cleaning of the equipment. It is an aspect we tend to underestimate in a comparative analysis because it refers to a moment in which the checkweigher is off - and two machines switched off work the same way: they don’t produce. However, this is exactly the point: the time spent cleaning the machine is unproductive time to the company. So, the faster the cleaning activity is, the better checkweigher performances.
This way of thinking underlies some important evolutions of the dynamic scale, which lead back to the following aspects:
Material: polished stainless steel is widely employed in this field because it can successfully withstand to deep cleaning operations and it has got easy-to-clean finishes.
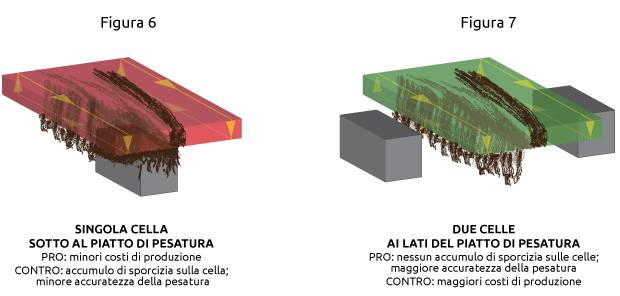
Design: Particular expedients, as the use of round pipes, of accurate finishings and rounded corners facilitate the cleaning activity and avoid the accumulation of dirt and contaminants. From this point of view, the placement identified for the weighing cell, the “heart” of the checkweigher, deserves a particular attention. A very common mistake consists in locating the cell under the conveyor (Figure 6), without taking into account that with this layout both product remains and dirt, gathered by the plate during the product transportation, will deposit on the cell when the belt spins underneath the plate. A way to successfully overcome the problem is using two cells, placed to the sides of the plate and hence away from product remains (Figure 7).
Quick-disassembly plates: locking and unlocking mechanisms allow plate detachment in few seconds and without any tools; this affords to clean extremely quickly even the inferior part of the machinery.
IP Grade: it is fundamental to check the index protection of the machinery so as to implement in the line a system compatible with the cleaning operations according to product type and working environment.
4. Robustness and longevity
All the previously discussed aspects contribute to grant the machinery solidity and longevity; aspects which are clearly essential to guarantee an adequate ROI (return on the machinery investment).
In addition to those, the employment of high level materials and components. A well-trained eye can identify effortlessly the research, development and sorting work underlying each component, whether it is a common or a taylor-made one; in this regard, a good index is the duration of the guarantee on the components offered by the manufacturer. It is a numerical and objective data, whereby it would be a shame not taking it into account in a comparative analysis.
Anyway, the quality of a made-in-Italy equipment can only be compared with a German one (no wonder they are the two main European exporters of capital goods for packaging industry 1) and no particular expertise is required to recognize the difference with extra-European equipment.
1 Source UCIMA: http://www.ipackima.com/en/content/press-release-industry-data-february-10-2016

